Does it feel like you’re navigating a maze when trying to locate the php.ini file in WordPress?
Well as it turns out, every WordPress-powered site (800,000M+ websites as of 2023) runs on PHP at around around 40%. In fact, it can be said that WordPress is why PHP remains so popular in the first place.
That means there’s likely a hell of a lot of site owners in the same boat as you.
Here’s the good news – you’ve come to the right place.
This guide is all about helping you locate and manipulate php.ini data in WordPress.
Let’s dive in.
What is php.ini?
Before we go hunting, let’s quickly review the the basics.
What we are referring to here is a configuration file that’s integral to the functioning of your Hypertext Preprocessor (PHP).
But what is PHP and why does it matter?
If you right click and select ‘Inspect’ on any webpage, you’ll see the source code that is responsible for creating and rendering the page that you see.
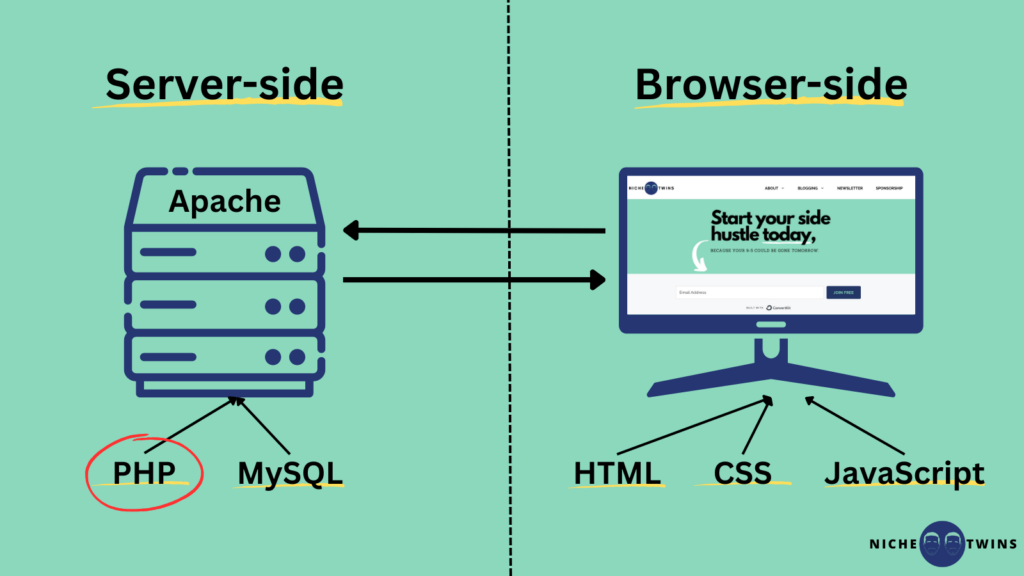
Some of that code language is processed ‘client-side‘ (aka by the browser) and some of that code is processed ‘server-side‘ (aka on the backend by a configured computer).
HTML, JavaScript and CSS all sit client-side. This code is interpreted by your browser and then rendered into a visual display.
PHP and MySQL sit server-side. This code is software that is installed on the server, allowing webpages to be served to your browser.

It’s your PHP code that allows your site to connect to your WordPress database and access the information needed by the server, to ultimately be displayed by the browser.
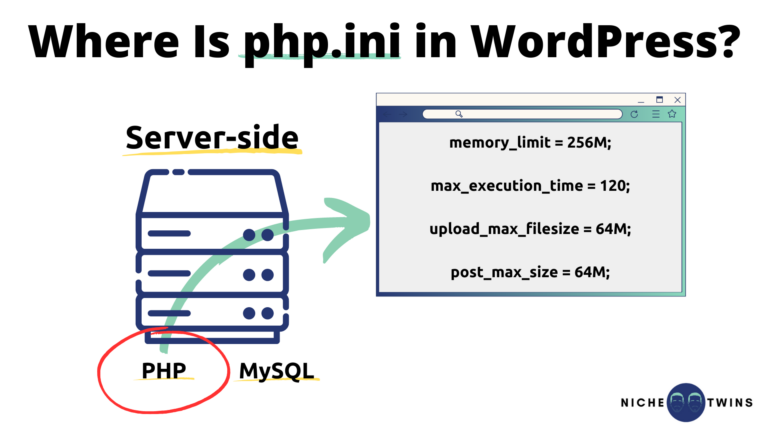
And it’s specifically the php.ini file that is responsible for setting parameters that influence various aspects of your server. These parameters include file upload sizes, resource limits, error displays, etc.
In other words, the parameters set by this file directly impact the performance and functionality of your site.
So, by adjusting these parameter settings, you can tailor your site’s PHP environment and enhance performance and user experience.
Where Is the php.ini File Located?
The file resides in the root directory of your server where your WordPress installation is located.
However, its exact location can vary depending on the type of server you are using, which is often dictated by your hosting provider.
Since Apache and NGINX handle over 85% of total webservers, one of the three approaches below is very likely to work for you.
Option 1: WP File Manager Plugin
I’m not a highly technical person.
If you’re like me, the first and easiest route to take is to install the WordPress plugin “WP File Manager“.
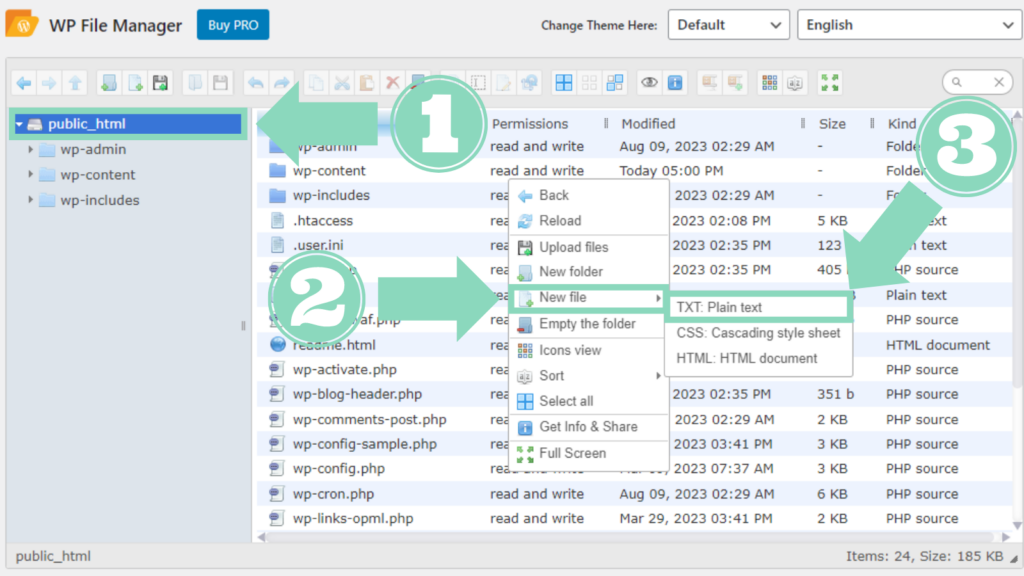
Once installed and activated, select ‘WP File Manager‘ from the WordPress dashboard menu.
Then, within the ‘public_html‘ folder, search for the php.ini file.
If it’s not there, that’s alight. Simply hover your cursor over the files, right click and select ‘New file‘. Then click ‘TXT: Plain text‘.

Finally, rename the file to “php.ini” and save it.
Option 2: cPanel
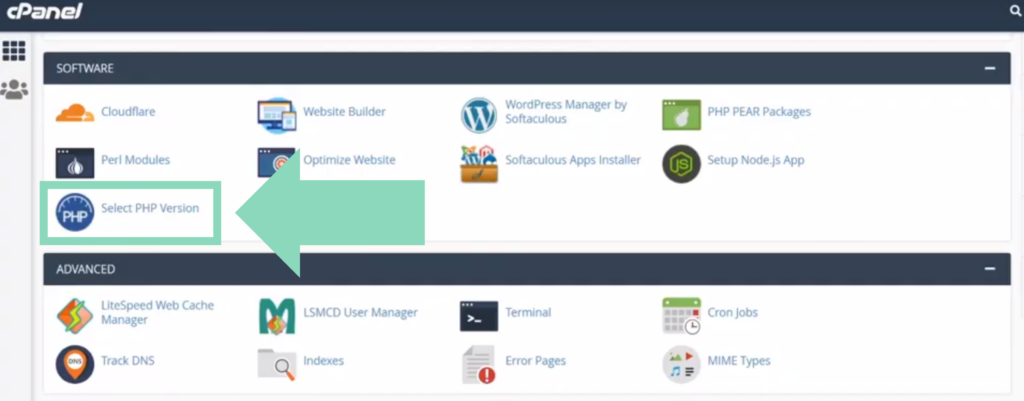
Alternatively, you can access the file via your cPanel, either directly or via your host provider.
To do so, login to the cPanel, scroll down to the Software section and click “Select PHP Version“.

From here on the PHP Selector landing page, click the Options tab.
Option 3: FTP Client
A third and final option is to access your WordPress root directory via an FTP client such as FileZilla.
Once the FTP is downloaded and installed on your computer, you can use it to directly access your site files.
The FTP credentials needed to link to your website were sent to you via email when you first signed up for a WordPress hosting service.
In the event you cannot find the email, you’ll need to contact your host provide (whether BlueHost, Cloudways, A2 Hosting, etc) and request the information.
Once you’ve gained access, look for the folder titled “public” and locate the php.ini file.
How do I Edit php.ini in WordPress?
Typically folks are trying to locate this file when a server error occurs, requiring a settings change to file uploads limits or extending the execution time for scripts.
Remember, editing the php.ini file is a powerful action that can significantly impact your site’s functionality. Always make sure to backup your original file before making any changes, so you can revert back if needed.
If you’ve accessed the file via a plugin or via an FTP client, editing the file involves using the code editor to modify its contents and saving the changes.
If you’ve access the file via your cPanel, in all likelihood you will have more restricted access based on your host’s settings. Instead of an open code editor field, you may see a page with only some customizable fields.
After making your desired changes, save the file and be sure to clear all cache.
If for any reason your access is restricted or your changes do not take effect, some PHP settings can be adjusted within the .htaccess and wp-config.php files.
Here are a few setting tweaks you can consider for optimal site performance:
1.) memory_limit = 256M;
2.) max_execution_time = 120;
3.) upload_max_filesize = 64M;
4.) post_max_size = 64M;
Shennan, Chris. “10 Essential PHP.ini Tweaks for Improved Web Performance.” Chris Shennan, 3 Apr. 2023, chrisshennan.com/blog/10-essential-phpini-tweaks-for-improved-web-performance. Accessed 17 Aug. 2023.
Final Word
The php.ini file is typically located in the root directory of your server where your WordPress installation is located.
The file is responsible for setting parameters that influence various aspects of your server including file upload sizes, resource limits, error displays, etc.
The three easiest ways to access it is via the WP File Manager plugin, the cPanel or an FTP client like FileZilla.
Altering the file and adjusting the server settings can improve your WordPress site’s overall performance.
Just remember, it’s always wise to backup your original file before making any changes!


