
When it comes to strong website branding in WordPress, the devil is in the details. This includes seemingly insignificant elements, like the color of your internal and external links.
Changing the color of your links to match a color in your site logo can be a subtle but effective branding technique. You can also use color to help individual links stand out, which can lead to improved conversions.
Even from a basic functionality perspective, colors can help provide readers with helpful visual cues that indicate which “state” a given link is in. Notably, there are four primary hyperlink states to consider:
- Normal state – a normal, unvisited link. This is your baseline state.
- Hover state – when a user positions their mouse over a link, but has not yet clicked it.
- Active state – the moment a link is clicked.
- Visited state – the user has already visited the link. This link will bring them to a page they’ve already seen.
Depending on the link state you wish to change and whether you are planning to apply these changes site-wide or on an individual basis, there are number of different methods you can consider.
There are four primary ways to change link color in WordPress:
- WordPress block editor (normal state and individual link updates).
- Theme color customizer (normal/hover state and site-wide link updates).
- Additional CSS (all states and site-wide link updates).
- ‘SiteOrigin CSS’ plugin (all states and individual link updates).
Method 1: WordPress Page/Post Block Editor
The quickest and easiest way to customize the normal state of individual link colors on a page or post is by using the WordPress block editor directly.
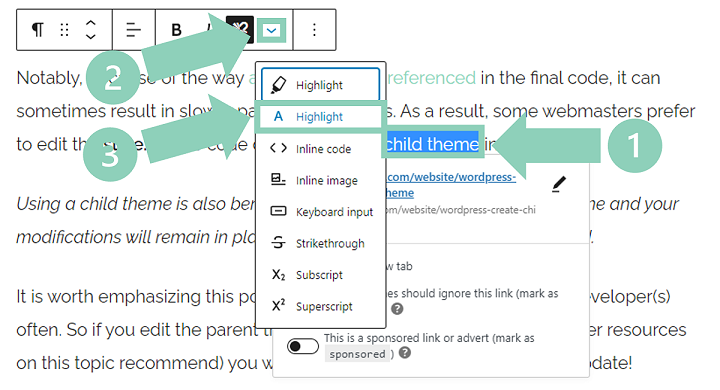
Within the ‘Edit Page‘ or ‘Edit Post‘ field, first highlight the link you wish to change. A small menu will appear just above the highlighted link. Next, click the downward arrow icon and select the Highlight option that has the letter “A” icon next to it.
Finally, make sure the “Text” tab is selected and then click anywhere in the white and gray checkered rectangle. Upon doing so, a large square and sliding color scale will appear.
You can now play around with the slider and click your mouse cursor in the square until you land on your desired link color.
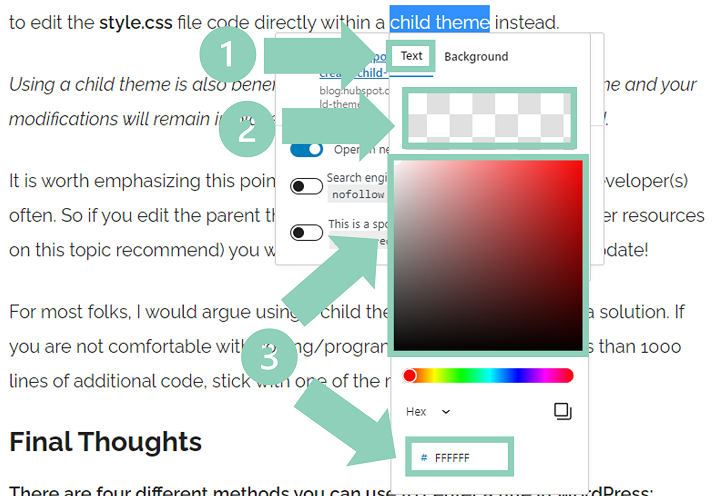
Alternatively, at the bottom of the pop up menu you will also notice that there is a “Hex #” field. If you know the exact value of your desired link color, this is a great option.
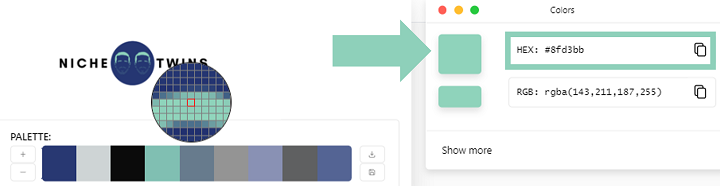
So, you have an image that includes the exact color you wish to use for your link, but you’re not sure how to identify the corresponding Hex code? Simply upload the image file to the Image Color Picker website, place your mouse over the desired color, and click it. The Hex code will automatically populate.
Pro Tip: You will need to follow a slightly different process to change the color of your menu text or background.
Method 2: Theme Color Customizer
If you are planning to make a site-wide change to your link colors, using the Gutenberg editor to make individual adjustments can be extremely time consuming.
A more effective method in this case would be to use your theme customizer instead. From your WordPress dashboard, start by navigating to Appearance > Customize.
Depending on your specific theme, the next few steps can vary a bit.
For most themes, you’ll want to select Colors from the menu on the left side of your screen. Next, you’ll need to dig around to determine which subsection link color is located in. In GeneratePress for example, it can be found in the Content drop down.
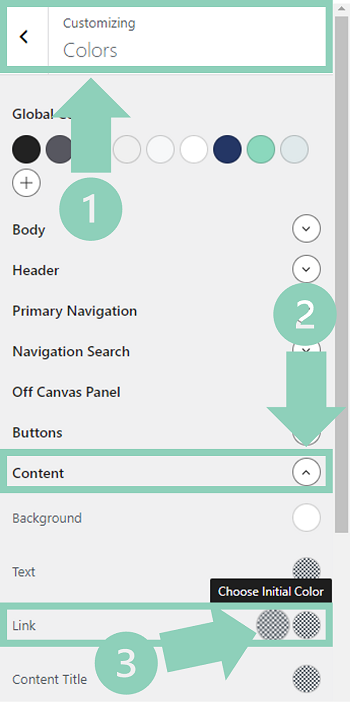
A limitation worth noting here is that the majority of themes typically only allow you to customize the normal and hover state of your hyperlinks. If you are interested in changing the color of the active and visited states, you’ll need to take a different approach.
Method 3: Link Color Custom CSS
If you want the ability to to customize all four link states site-wide, an alternative method you can consider is adding some custom CSS to your website.
Because this involves adding a bit of code, beginner bloggers will sometimes shy away from this approach. But rest assured, zero coding ability is required here.
Once again, head over to your WordPress theme customizer by selecting Appearance > Customize. Then, from the theme customizer menu select Additional CSS near the bottom.
Now just copy the code beneath the desired link state you wish to customize below, and paste it into the ‘Additional CSS’ field. As a final step, replace “HEXCODE” with the actual Hex value of your desired color.
/* Normal state. */a {
color: #HEXCODE;
}/* Hover state. */a:hover {
color: #HEXCODE;
}/* Active state. */a:active {
color: #HEXCODE;
}/* Visited state. */a:visited {
color: #HEXCODE;
}
Method 4: ‘SiteOrigin CSS’ Plugin
Ok, so maybe this whole website building space is totally new to you and you’re just not interested in playing around with custom CSS. Not a problem.
Yet another highly effective approach you can try involves using the SiteOrigin CSS plugin.
From the WordPress dashboard, select Plugins > Add New. In the search field type “SiteOrigin CSS” and then install and activate the plugin.
Once activated, navigate to Appearance > Custom CSS. Then click the eye icon in the top right corner of the screen. This will open the SiteOrigin visual editor.
Now this is the cool part.
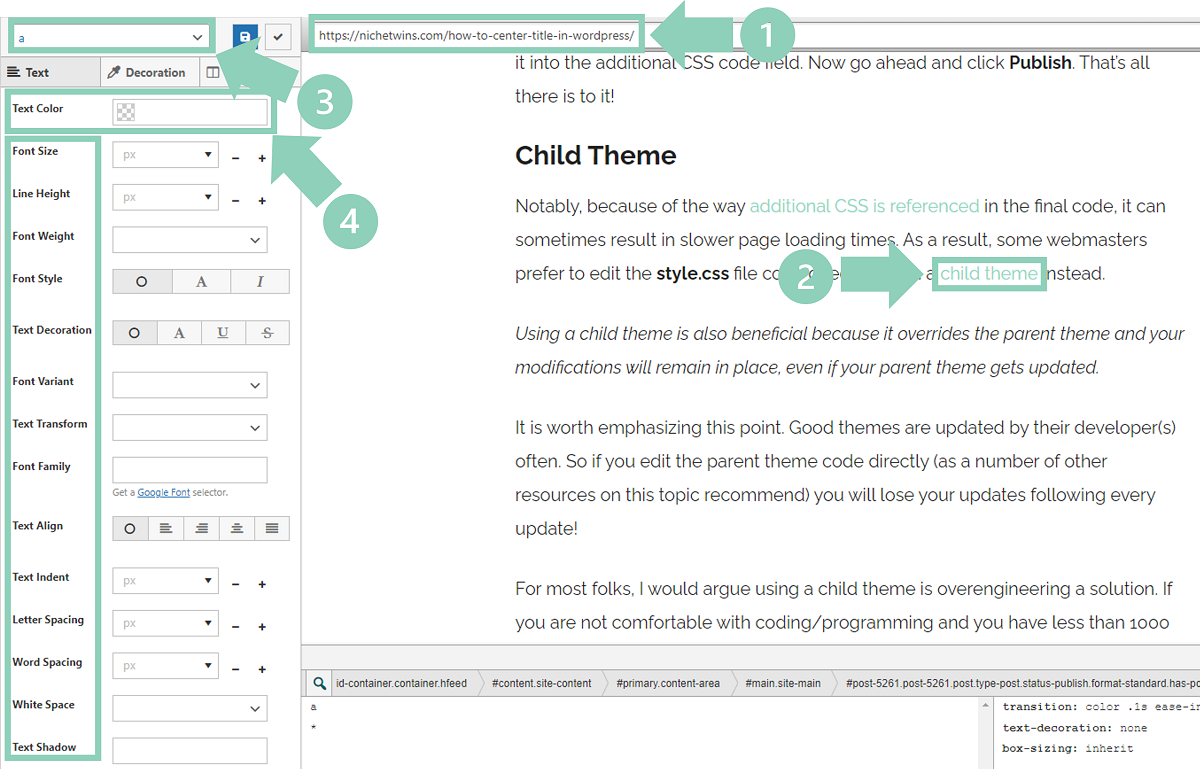
- Start by entering the URL of the page or post you wish to edit.
- Then, click on the link you intend to modify.
- Use the drop down menu to select the link state you wish to update (in the example below, normal state is selected).
- Lastly, select the color you desire in the Text Color subsection and click the save icon. That’s it!
There are two really amazing aspects of this plugin. First, it allows you to make these changes without ever touching the code directly yourself. Second, you can change SO much more than just the link color.
For example, if you wanted one of your affiliate links to increase in font size when a reader hovers over it, you can do that. In fact, you can change just about every link text and font element you can imagine!
Final Thoughts
Changing link colors in WordPress can help support your branding, lead to improved conversions, and provide useful visual cues to your readers. Ultimately, the optimal method to make these changes will depend on a few key factors.
If you are planning to change the normal state of an individual link, using the WordPress block editor directly is the easiest approach. On the other hand, if you wish to change all states of an individual link, consider installing the SiteOrigin CSS plugin.
For site-wide changes to the normal or hover states, the theme color customizer is your best bet. And finally, for site-wide updates to all states, consider using the Additional CSS field.