
WordPress site owners who have deployed a complex theme, plugin, setting, or form have likely encountered the “max input vars” error at one point or another.
The beauty of WordPress as a content management system, is it processes all of your site’s data behind the scenes. In fact, in order for everything to run smoothly and function properly, it needs to process a significant amount of data and information all at once.
However, in an effort to prevent potential issues, WordPress has an established limit on the total number of input variables that can be handled simultaneously. This limit is referred to as “max input vars”.
Whenever you start to approach this default limit, you will receive a warning message within the dashboard citing the following:
You are approaching the post variable limit imposed by your sever configuration. Please increase your max_input_vars directive in php.ini.
This is the systems way of telling you that you are giving it more information than it can currently handle. Do not ignore this message! If you proceed without making any adjustments, things can start to break on your site.
To increase max input vars in WordPress, first check the Server Site Health dashboard to identify the recommended “PHP max input variables” and “PHP time limit” values. Then update the “.user.ini” file within the File Manager accordingly. If the issue persists, try updating the “.htaccess” or “wp-config.php” files instead.
How To Check Your WordPress Site Health
From the main WordPress dashboard, start by navigating to Tools > Site Health.
Then, under the Info tab, click Server.
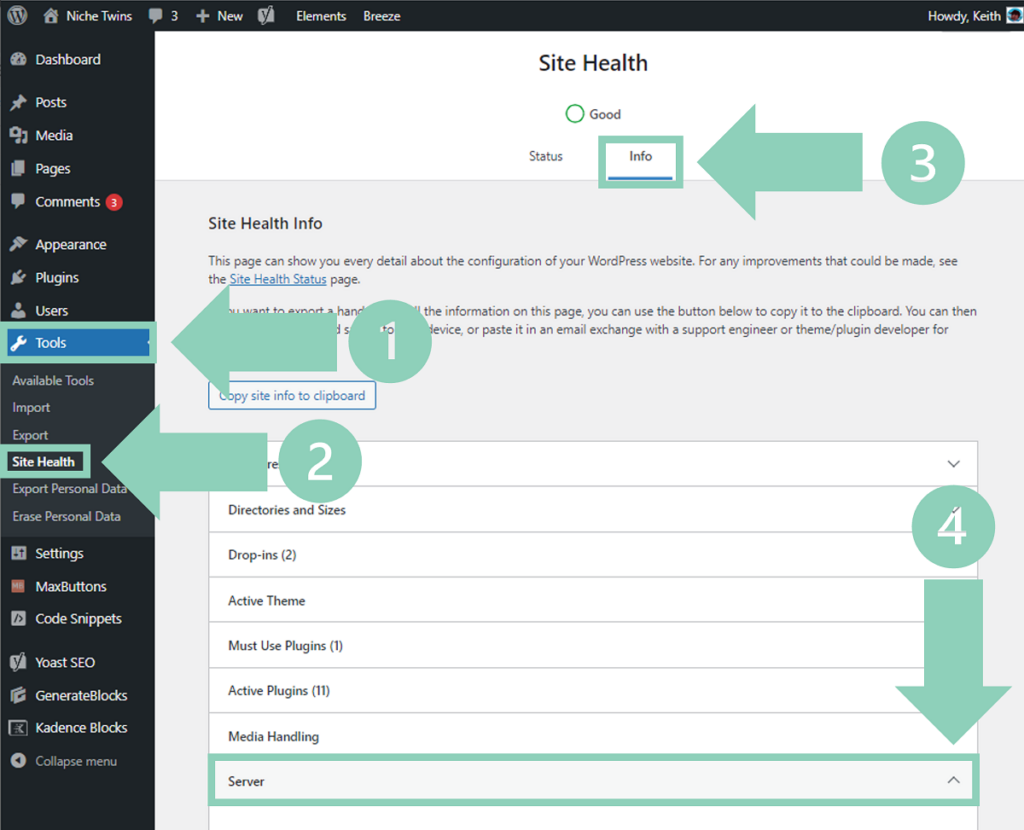
Next, within the Server drop down field, locate PHP max input variables and PHP time limit.
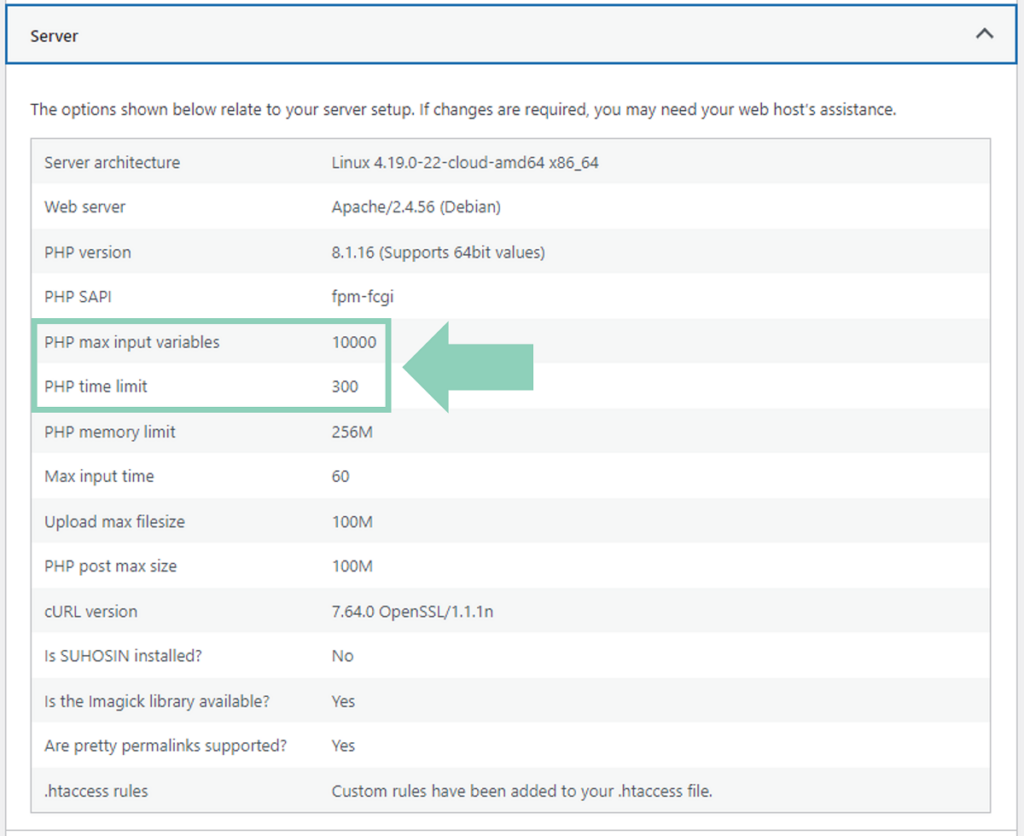
Because our Niche Twins website is comfortably within the allowable limit, no message is currently present. However, if there is an issue with your site, you will see a short error message next to each of these specifications.
The message will state that the current value is insufficient. It will also indicate the value you need to adjust both of these specifications to, in order to meet your theme requirements.
Update “.user.ini” File
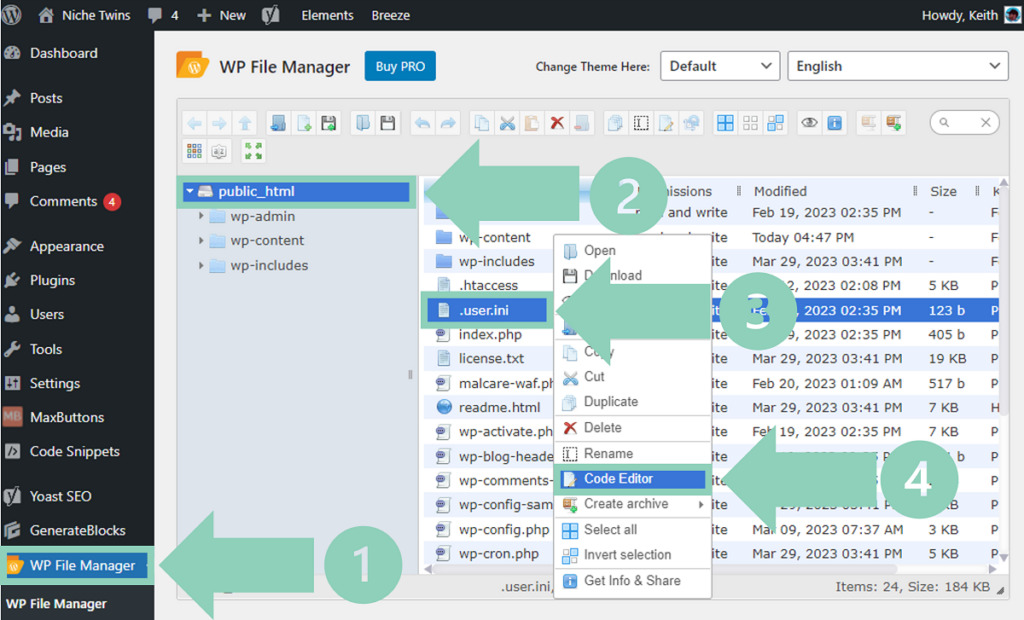
To make the necessary adjustments you will need to access your WordPress File Manager. To do so, log into your cPanel directly or via your host and select File Manager. Alternatively you can download the WP File Manager plugin.
Now locate the .user.ini file within the root folder File Manager. This is the file that allows you to make changes to your site’s PHP settings.
Before we get started right-click on it, and select Download. By doing so, you now have a backup file in case something goes wrong!
Next, right click on the .user.ini file again and this time select Edit or Code Editor from the drop down menu.
Notably, if you cannot locate this file don’t worry. Simply select the create new file option and add a new file with the name “.user.ini”.
Within the the code field, copy and paste the following two lines of code:
max_input_vars = XXXX;
max_execution_time = XXXX;
Be sure to replace “XXXX” with with the actual value recommended by the Server Site Health page.
For example, if your recommended PHP max input variables is 5000, the first line of code above would read “max_input_vars = 5000;”.
From here you can click Save Changes and go back to the WordPress Server Site Health dashboard. Finally, refresh the page to ensure that the the error messages have gone away and the issue is resolved.
Additional Troubleshooting Options
Some users may find that even after they make these .user.ini file updates, they are still receiving an error message for one or both of these specifications.
Without going too deep into the weeds, oftentimes this variability in user success rate is directly tied to the hosting service you are using.
As a result, you may need to use some trial and error and try making modifications to a different root file instead.
Update “.htaccess” File
The next file to attempt editing is your .htaccess file. This file is located within the same root folder File Manager field.
Once again, be sure to download a backup prior to editing the file directly.
This time around, within the code editor, copy and paste the following code:
php_value max_input_vars XXXX;
php_value max_execution time XXXX;
Notably, if only one of these specifications is still throwing an error, you need only add the line of code that corresponds to that specification.
Update “wp-config.php” File
Alternatively, you can attempt to edit your wp-config.php file.
Following the same general steps previously detailed, copy and paste the following code into the wp-config.php file editor:
@ini_set( ‘max_input_vars’, XXXX);
set_time_limit(XXXX);
Contact Host Customer Service
So you’ve tried editing each of these files, and despite refreshing the Site Health page following each attempt, you are still receiving an error message?
It’s time to contact your web host customer service line.
While most common host providers today allow users to adjust these PHP specifications, some do not. Unfortunately, in the event none of these methods worked, you likely fall in this camp.
So give your host a shout and ask them to make these adjustments for you!
Final Word
Most WordPress users who come across the max input vars error can solve the problem by editing their site’s .user.ini file.
However, it’s worth noting that this method won’t successfully resolve the issue for everyone. Some users will need to try updating their .htaccess or wp-config.php files instead.
As a final measure, if none of these file edits turn out to be successful, you’ll need to contact your host provider and ask them to make the adjustments for you.